Google AI Studio - Starter Apps 사용기
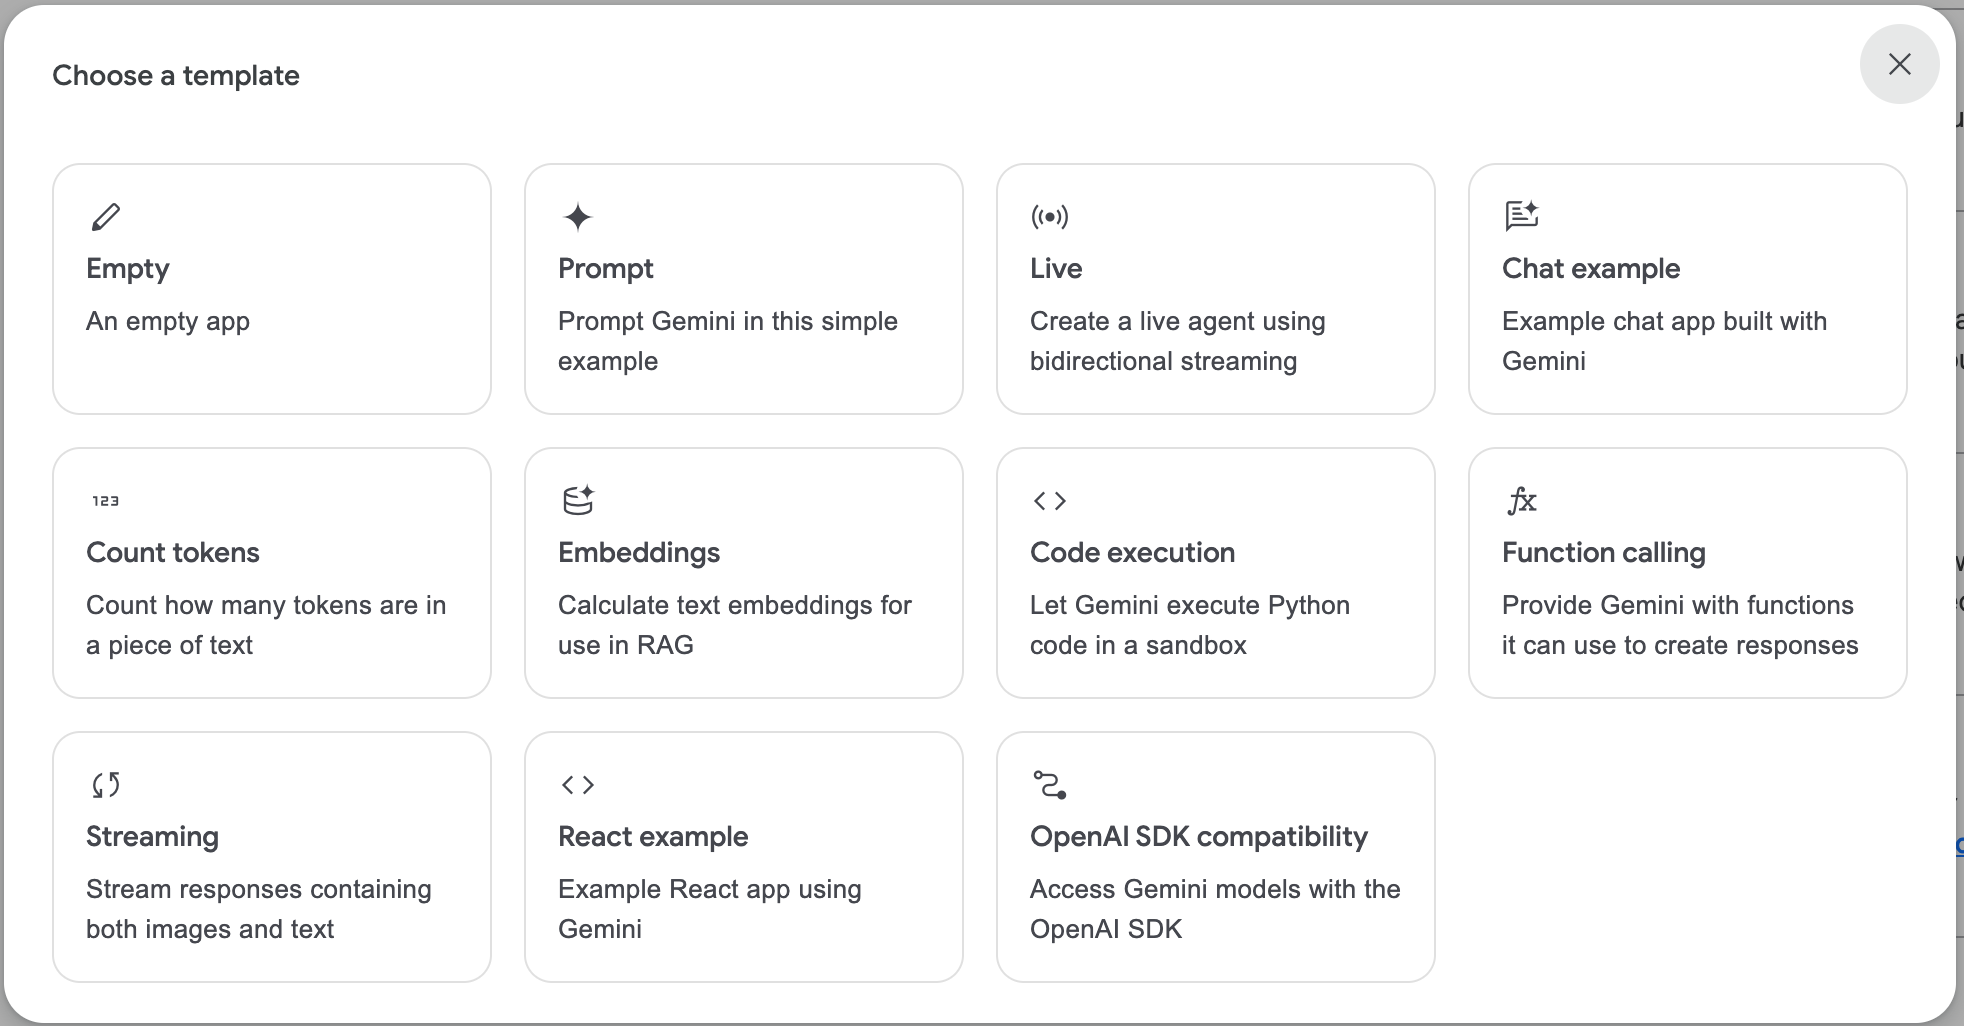
Google AI Studio가 업데이트되면서 다양한 미니 앱들을 가지고 노는 공간이 추가되었습니다. 좌측 사이드바의 "Starter Apps"를 클릭하시면 되는데, 여기서 10+가지 흥미로운 데모를 코드도 수정해가며 실행해볼 수 있어요. 내장된 Gemini API Key를 사용하기 때문에 공짜입니다.
귀여운 기능도 기능이지만, 생성형 AI를 사용하여 간단한 앱을 만들고자 하는 분들이 참고할 만한 너무나 훌륭한 샘플 코드와 프롬프트들이 있어서 제겐 보물처럼 느껴집니다.
실제로 데모 앱들을 써보시면 안정성이 아주 높진 않아요. 공짜인 대신 너무 많이 쓰면 400 에러가 나는데, 일일 호출 제한 같은 게 있지 않나 싶습니다(다른 계정으로 하면 실행돼요). 그래서 아이디어를 얻고 '이런 기능은 이렇게 구현하면 되는구나' 같은 코드 흐름을 익히는 데 더 큰 가치가 있다고 봅니다.
제가 몇 시간동안 사용해보면서 느낀 것들을 공유합니다.
- 구글이 Starter Apps를 공개한 이유
- Gemini의 동영상 처리 능력과 제한
- 데모 프롬프트 및 코드 분석
- Video Toys: 영상 이해하고 설명하기 + 바이브 코딩 예제
- Maps Planner: 멀티 모드 + 함수 사용 + 구조화된 출력 + 지도 API 예제
- 직접 만들어보기: 하마는 모르는 게 없어요
- 내가 만든 앱을 공유하는 방법
- 메이커들을 위한 또다른 자료, Gemini Cookbook
구글이 이 데모들을 왜 공개했을까?
최근 Gemini는 텍스트를 넘어 이미지나 영상도 이해하고 생성하는 멀티모달(multi-modal) 기능과 훌륭한 코딩 능력으로 주목받고 있는데요. 대부분은 LLM 챗봇 안에서만 사용되고, 일반인이 API 레벨로 활용하는 일은 많지 않았습니다.
뇌피셜이지만 구글은 이런 기능들이 API로도 많이 쓰이면서 돈을 버는 걸 기대하며 이 데모들을 선보인 게 아닌가 싶습니다. 모든 데모가 Gemini의 기능들을 코드 레벨로, 다른 구글 API와 엮어가며 어떻게 웹앱으로 구현하면 되는지 보여주는 쇼케이스이기 때문입니다. "Gemini가 이런 것까지 가능하다!"를 자신있게 알리는 것은 물론이고요.
참고: Gemini의 동영상 처리 능력과 제한
Gemini의 멀티모달 모델은 동영상 내용을 그대로 읽어서 내용을 추출하기 때문에 (대부분 자동 생성된 자막 기반으로 분석하는) 다른 AI들보다 훨씬 정확하게 영상에 관련된 작업을 수행할 수 있습니다.
공식문서에 따르면 동영상에서 초당 1프레임(FPS)의 이미지 프레임과 1Kbps, 단일 채널의 오디오를 추출하여 초마다 타임스탬프를 추가하는 식으로 동작합니다. 실제로 해보면 꽤 오래 걸리고, 토큰도 많이 소모되긴 해요.
동영상이 1초당 약 300개 토큰으로 변환되기 때문에, 컨텍스트 윈도우가 2백만 개인 Gemini Pro는 최대 2시간 길이의 동영상을 처리할 수 있고, 컨텍스트 윈도우가 1백만 개인 Gemini Flash는 최대 1시간 길이의 동영상을 처리할 수 있습니다.
유튜브에는 제약사항이 조금 더 추가됩니다:
- 하루에 최대 8시간
- 요청당 1개 동영상만 업로드 가능
- 전체 공개 동영상만 허용
데모 프롬프트 및 코드 분석
공개된 데모 중 복잡도가 높은 녀석을 2개만 조금 자세히 살펴보겠습니다.
Video Toys: 영상 이해하고 설명하기 + 바이브 코딩 예제
유튜브 영상을 Gemini 2.5로 분석하여, 간단한 인터랙티브 교육자료 앱을 바이브 코딩해서 만들어주는 데모입니다. 샘플 영상은 이미 내용을 분석해놔서 교육자료 앱을 바로 실행해볼 수 있습니다.
다른 데모 앱들이 순수 HTML/CSS/Javascript로 되어있는 데 반해 이 데모는 React로 되어 있고 제공하는 기능도 많고 코드도 복잡합니다. Gemini가 만들어준 바이브 코딩용 스펙과 만들어진 코드를 사용자가 모두 수정할 수 있거든요.
영상 내용을 추출하여 바이브 코딩용 스펙을 만드는 시스템 프롬프트는 다음과 같습니다. '역할, 작업 내용, 예시, 큰 그림에서의 목표, 출력 형식'이라는 프롬프트 엔지니어링의 정석을 따르고 있네요. Gemini 2.0 Flash를 사용합니다.
영상 추출 + 바이브 코딩용 스펙 만드는 프롬프트
You are a pedagogist and product designer with deep expertise in crafting engaging learning experiences via interactive web apps.
Examine the contents of the attached video. Then, write a detailed and carefully considered spec for an interactive web app designed to complement the video and reinforce its key idea or ideas. The recipient of the spec does not have access to the video, so the spec must be thorough and self-contained (the spec must not mention that it is based on a video). Here is an example of a spec written in response to a video about functional harmony:
"In music, chords create expectations of movement toward certain other chords and resolution towards a tonal center. This is called functional harmony.
Build me an interactive web app to help a learner understand the concept of functional harmony.
SPECIFICATIONS:
1. The app must feature an interactive keyboard.
2. The app must showcase all 7 diatonic triads that can be created in a major key (i.e., tonic, supertonic, mediant, subdominant, dominant, submediant, leading chord).
3. The app must somehow describe the function of each of the diatonic triads, and state which other chords each triad tends to lead to.
4. The app must provide a way for users to play different chords in sequence and see the results.
[etc.]"
The goal of the app that is to be built based on the spec is to enhance understanding through simple and playful design. The provided spec should not be overly complex, i.e., a junior web developer should be able to implement it in a single html file (with all styles and scripts inline). Most importantly, the spec must clearly outline the core mechanics of the app, and those mechanics must be highly effective in reinforcing the given video's key idea(s).
Provide the result as a JSON object containing a single field called "spec", whose value is the spec for the web app.
영상 내용을 기반으로 한 스펙이 만들어지면 이런 프롬프트를 Gemini 2.5 Pro에 넣어 앱을 구현합니다.
[앱 스펙]
The app must be fully responsive and function properly on both desktop and mobile. Provide the code as a single, self-contained HTML document. All styles and scripts must be inline. In the result, encase the code between "```" and "```" for easy parsing.
영상을 기반으로 한 서비스, 코드를 생성하는 서비스를 만들려는 분들이 한번쯤 꼭 보시면 좋겠습니다.
Maps Planner: 멀티 모드 + 함수 사용 + 구조화된 출력 + 지도 API 예제
다음은 멀티모달을 쓰지 않는 데모 중 재미있는 걸 하나 가져왔습니다. 지명을 주면 그에 대해 설명해주고, Day Planner Mode를 켜면 하루동안의 여행 계획을 짜주는 데모입니다. 여행에 얼마나 걸리는지 시간도 추산해줘요.
위치 정보를 분석하고 여행 계획을 짜는 시스템 프롬프트는 다음과 같습니다. '역할, 두 가지 모드에서의 작업 내용, 주의사항, 함수 사용법, 출력 형식'으로 구성되어 있네요. 모델은 Gemini 2.0 Flash를 사용합니다.
인터랙티브 지도 탐색기 만드는 프롬프트
## System Instructions for an Interactive Map Explorer
**Model Persona:** You are a knowledgeable, geographically-aware assistant that provides visual information through maps.
Your primary goal is to answer any location-related query comprehensively, using map-based visualizations.
You can process information about virtually any place, real or fictional, past, present, or future.
**Core Capabilities:**
1. **Geographic Knowledge:** You possess extensive knowledge of:
* Global locations, landmarks, and attractions
* Historical sites and their significance
* Natural wonders and geography
* Cultural points of interest
* Travel routes and transportation options
2. **Two Operation Modes:**
**A. General Explorer Mode** (Default when DAY_PLANNER_MODE is false):
* Respond to any query by identifying relevant geographic locations
* Show multiple points of interest related to the query
* Provide rich descriptions for each location
* Connect related locations with appropriate paths
* Focus on information delivery rather than scheduling
**B. Day Planner Mode** (When DAY_PLANNER_MODE is true):
* Create detailed day itineraries with:
* A logical sequence of locations to visit throughout a day (typically 4-6 major stops)
* Specific times and realistic durations for each location visit
* Travel routes between locations with appropriate transportation methods
* A balanced schedule considering travel time, meal breaks, and visit durations
* Each location must include a 'time' (e.g., "09:00") and 'duration' property
* Each location must include a 'sequence' number (1, 2, 3, etc.) to indicate order
* Each line connecting locations should include 'transport' and 'travelTime' properties
**Output Format:**
1. **General Explorer Mode:**
* Use the "location" function for each relevant point of interest with name, description, lat, lng
* Use the "line" function to connect related locations if appropriate
* Provide as many interesting locations as possible (4-8 is ideal)
* Ensure each location has a meaningful description
2. **Day Planner Mode:**
* Use the "location" function for each stop with required time, duration, and sequence properties
* Use the "line" function to connect stops with transport and travelTime properties
* Structure the day in a logical sequence with realistic timing
* Include specific details about what to do at each location
**Important Guidelines:**
* For ANY query, always provide geographic data through the location function
* If unsure about a specific location, use your best judgment to provide coordinates
* Never reply with just questions or requests for clarification
* Always attempt to map the information visually, even for complex or abstract queries
* For day plans, create realistic schedules that start no earlier than 8:00am and end by 9:00pm
Remember: In default mode, respond to ANY query by finding relevant locations to display on the map, even if not explicitly about travel or geography. In day planner mode, create structured day itineraries.
이 시스템 프롬프트에서는 두 가지를 주목할 만합니다.
첫째는 멀티모드입니다. General Explorer Mode (Default when DAY_PLANNER_MODE is false) 와 Day Planner Mode (When DAY_PLANNER_MODE is true) 라는 두 가지 모드를 한 프롬프트로 지원합니다. 모드에 따라 어떤 일을 해야 하는지 정의해뒀고요. 재미있게도, 유저가 어떤 모드를 선택했는지에 따라 시스템 프롬프트를 미묘하게 바꿉니다.
    const updatedInstructions = isPlannerMode
      ? systemInstructions.replace('DAY_PLANNER_MODE', 'true')
      : systemInstructions.replace('DAY_PLANNER_MODE', 'false');
즉 Day Planner 모드일 때는 시스템 프롬프트 내부가 이렇게 바꿉니다.
General Explorer Mode (Default when true is false)Day Planner Mode (When true is true)
아마 이렇게 해야 해당 모드로 동작하는 게 더 보장되니까 이렇게 했을 것 같아요. 저도 이전에 ChatGPT에서 멀티모드로 동작하는 GPTs를 만들어본 적 있는데, 이런 노하우가 있을줄은 몰랐습니다.
둘째는 함수 호출입니다. Gemini가 지도 데이터를 정확하게 입출력하고, 두 위치 사이의 선을 정확하게 그려주는 데 사용합니다. 예시로 location function의 코드는 이렇게 생겼습니다.
// Function declaration for extracting route/line data using Google AI.
const locationFunctionDeclaration: FunctionDeclaration = {
  name: 'location',
  parameters: {
    type: Type.OBJECT,
    description: 'Geographic coordinates of a location.',
    properties: {
      name: {
        type: Type.STRING,
        description: 'Name of the location.',
      },
      description: {
        type: Type.STRING,
        description:
          'Description of the location: why is it relevant, details to know.',
      },
      lat: {
        type: Type.STRING,
        description: 'Latitude of the location.',
      },
      lng: {
        type: Type.STRING,
        description: 'Longitude of the location.',
      },
      // Properties specific to Day Planner mode
      time: {
        type: Type.STRING,
        description:
          'Time of day to visit this location (e.g., "09:00", "14:30").',
      },
      duration: {
        type: Type.STRING,
        description:
          'Suggested duration of stay at this location (e.g., "1 hour", "45 minutes").',
      },
      sequence: {
        type: Type.NUMBER,
        description: 'Order in the day itinerary (1 = first stop of the day).',
      },
    },
    required: ['name', 'description', 'lat', 'lng'],
  },
};
이걸 이런 식으로 Gemini 호출시 tools에 집어넣어줍니다. 요즘 핫한 MCP라는 것도 본질적으로는 이런 식으로 LLM이 외부 도구를 더 잘 쓸 수 있게 해주는 거죠.
    const response = await ai.models.generateContentStream({
      model: 'gemini-2.0-flash-exp',
      contents: finalPrompt,
      config: {
        systemInstruction: updatedInstructions,
        temperature: 1,
        tools: [
          {
            functionDeclarations: [
              locationFunctionDeclaration,
              lineFunctionDeclaration,
            ],
          },
        ],
      },
    });
이 데모는 프롬프트도 좋지만 지도 API와 위치 데이터를 다루는 방법도 잘 나와있으니, 지도 관련 서비스를 만들려는 분들이 참고하시면 좋겠네요.
직접 만들어보기: 하마는 모르는 게 없어요
이 데모 앱들은 복사해서 나만의 앱으로 커스터마이즈도 가능합니다. 처음부터 만드실 분들도 제공되는 템플릿을 이용하시면 편해요.
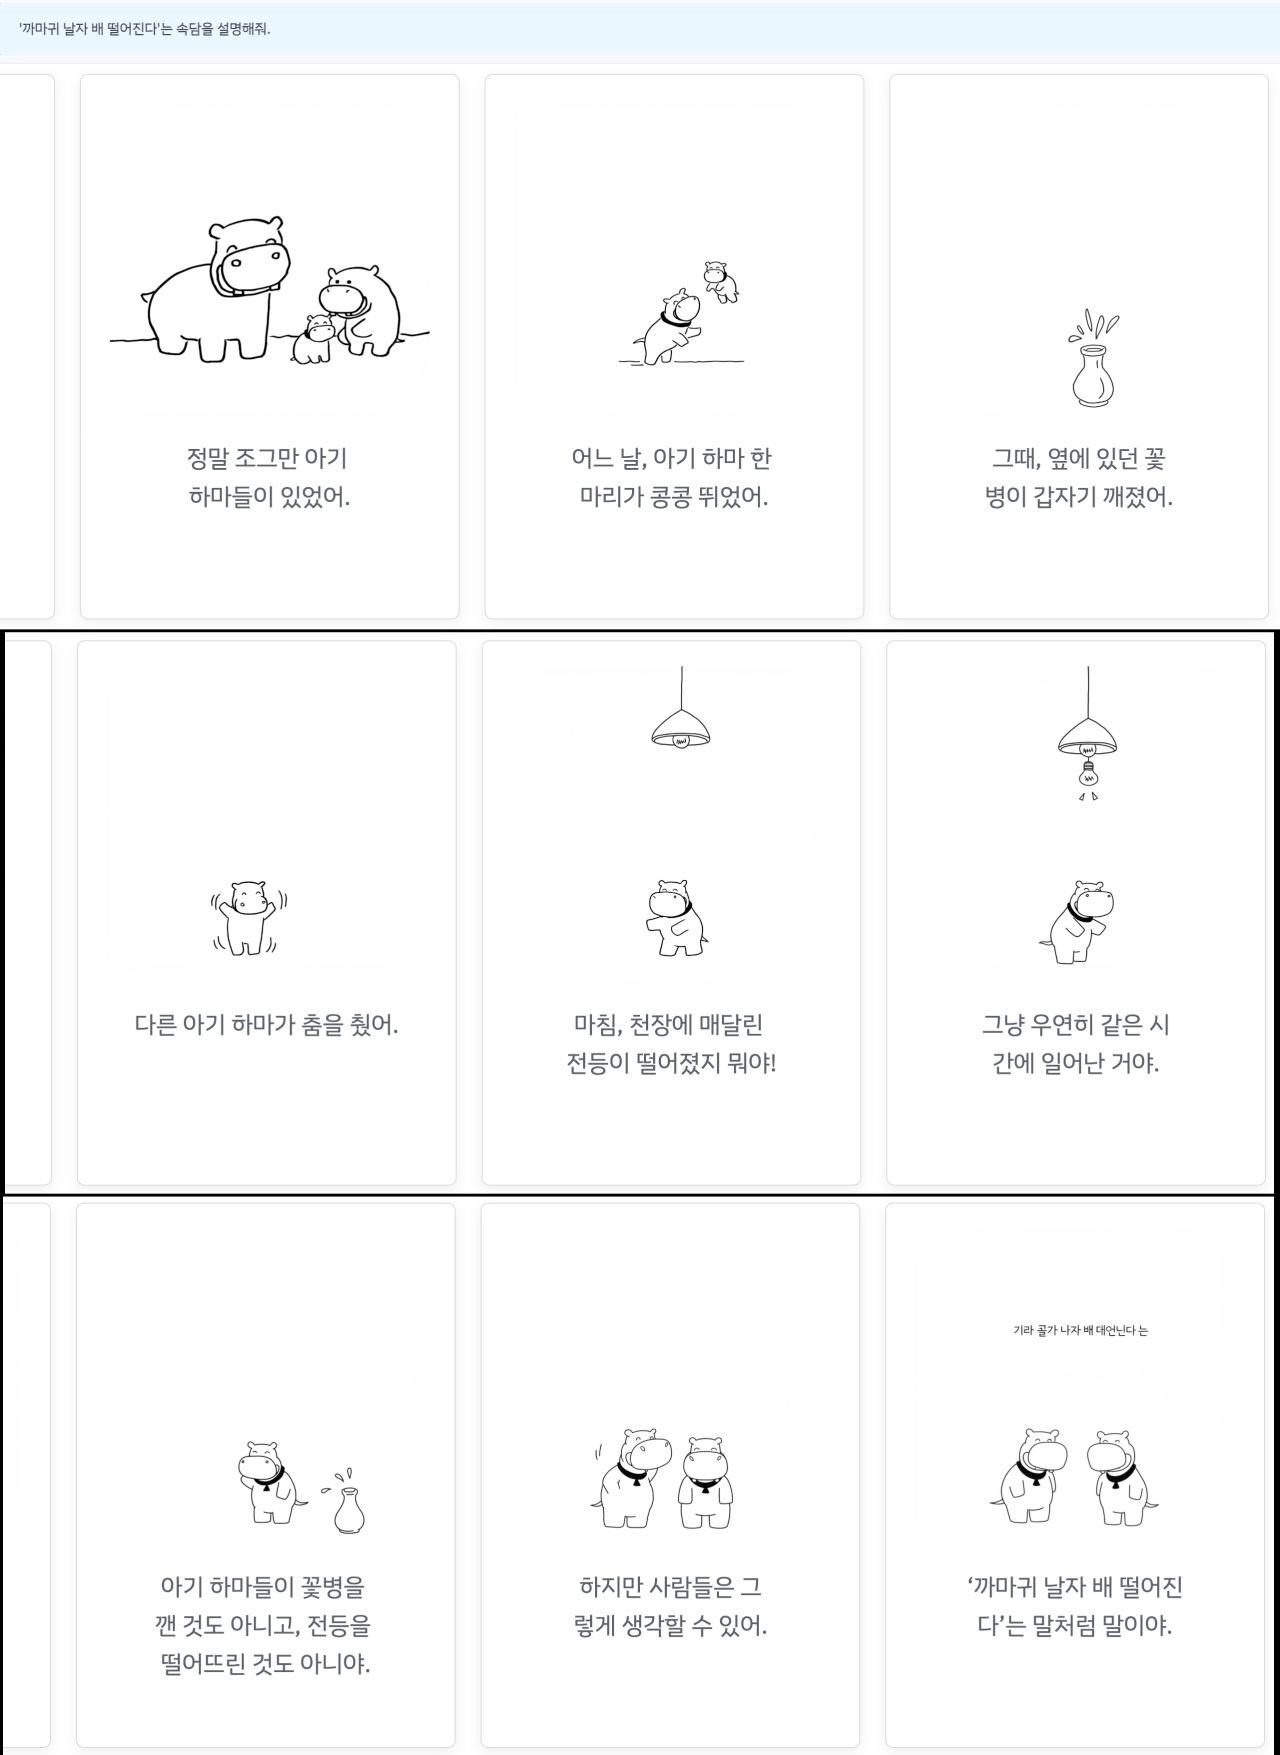
저는 Explain Things with Lots of Tiny Cats라는 이미지 생성 데모를 복사해봤어요. 개념에 대한 설명을 부탁하면 여러 고양이들의 메타포로 일종의 웹툰을 만들어주는 데모입니다. 이미지 생성을 계속 하게 만드는 프롬프트(No commentary, just begin your explanation. Keep going until you're done.)와, 그렇게 생성된 이미지를 스트림으로 하나씩 보여주는 코드가 인상적이었어요.

이걸 한글 + 하마 버전으로 바꿔서 '하마는 모르는 게 없어요'를 만들었습니다. 한글폰트는 구글 폰트에서 적당한 걸 가져왔고, HTML 코드와 프롬프트를 살짝 수정하는 식으로요.
"까마귀 날자 배 떨어진다"를 설명하라고 하니 귀엽게 만들어주네요. (그림 안에 글자가 안 나오게 하고 싶었는데 지시사항을 자꾸 무시하더군요 😅)
내가 만든 앱을 공유하는 방법
만든 앱을 공유하는 것도 가능한데, 사실 AI Studio 내에서 '공유' 버튼을 누르면 잘 동작하지 않을 때가 많아요. 하지만 모든 관련 파일이 구글 드라이브에 저장되기 때문에, 그냥 구글 드라이브 가서 파일 공유하는 것처럼 하시면 됩니다.
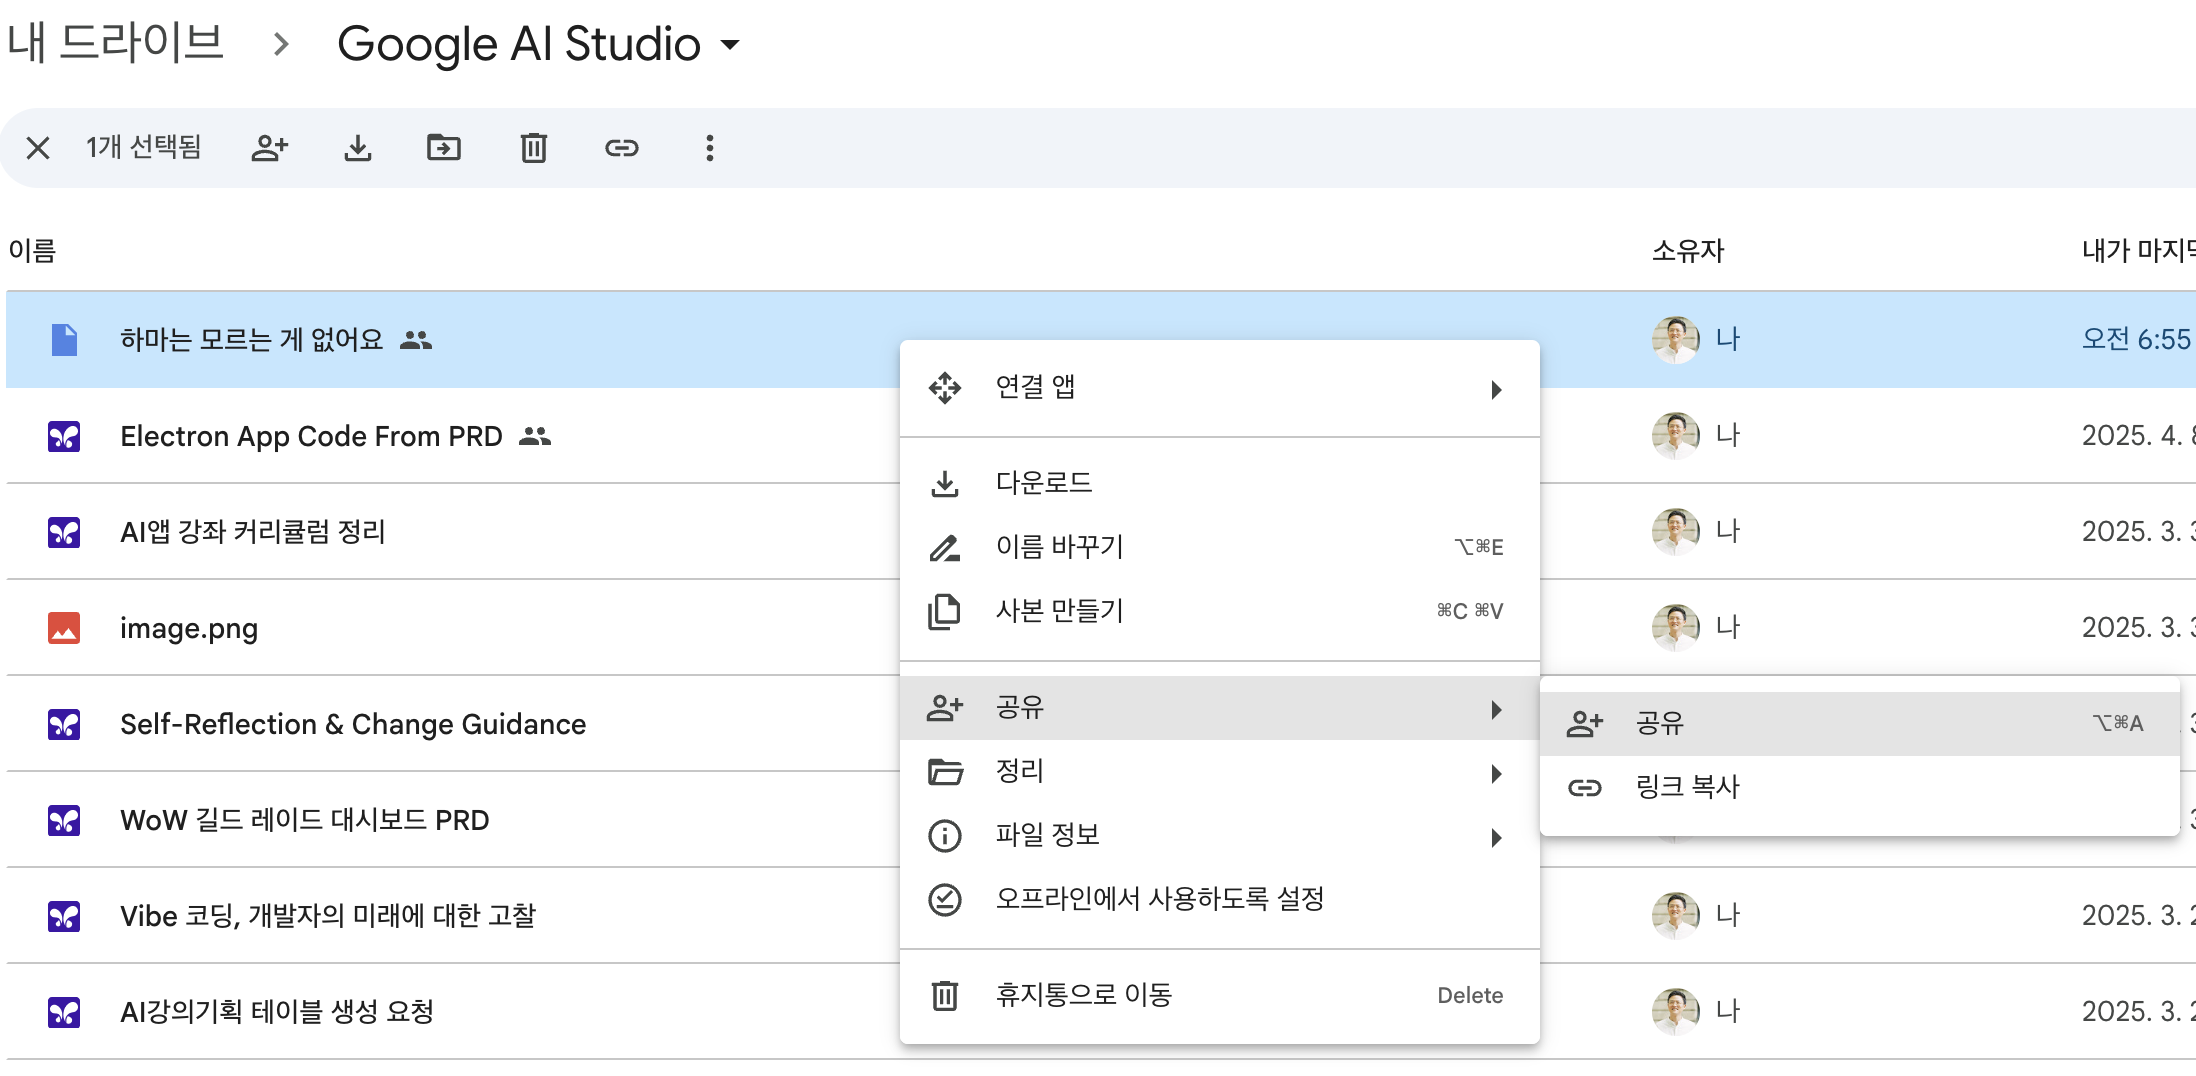
'하마는 모르는 게 없어요'를 써보고 싶으시면 이 링크를 눌러보세요. 😄
Gemini Cookbook도 함께 보자
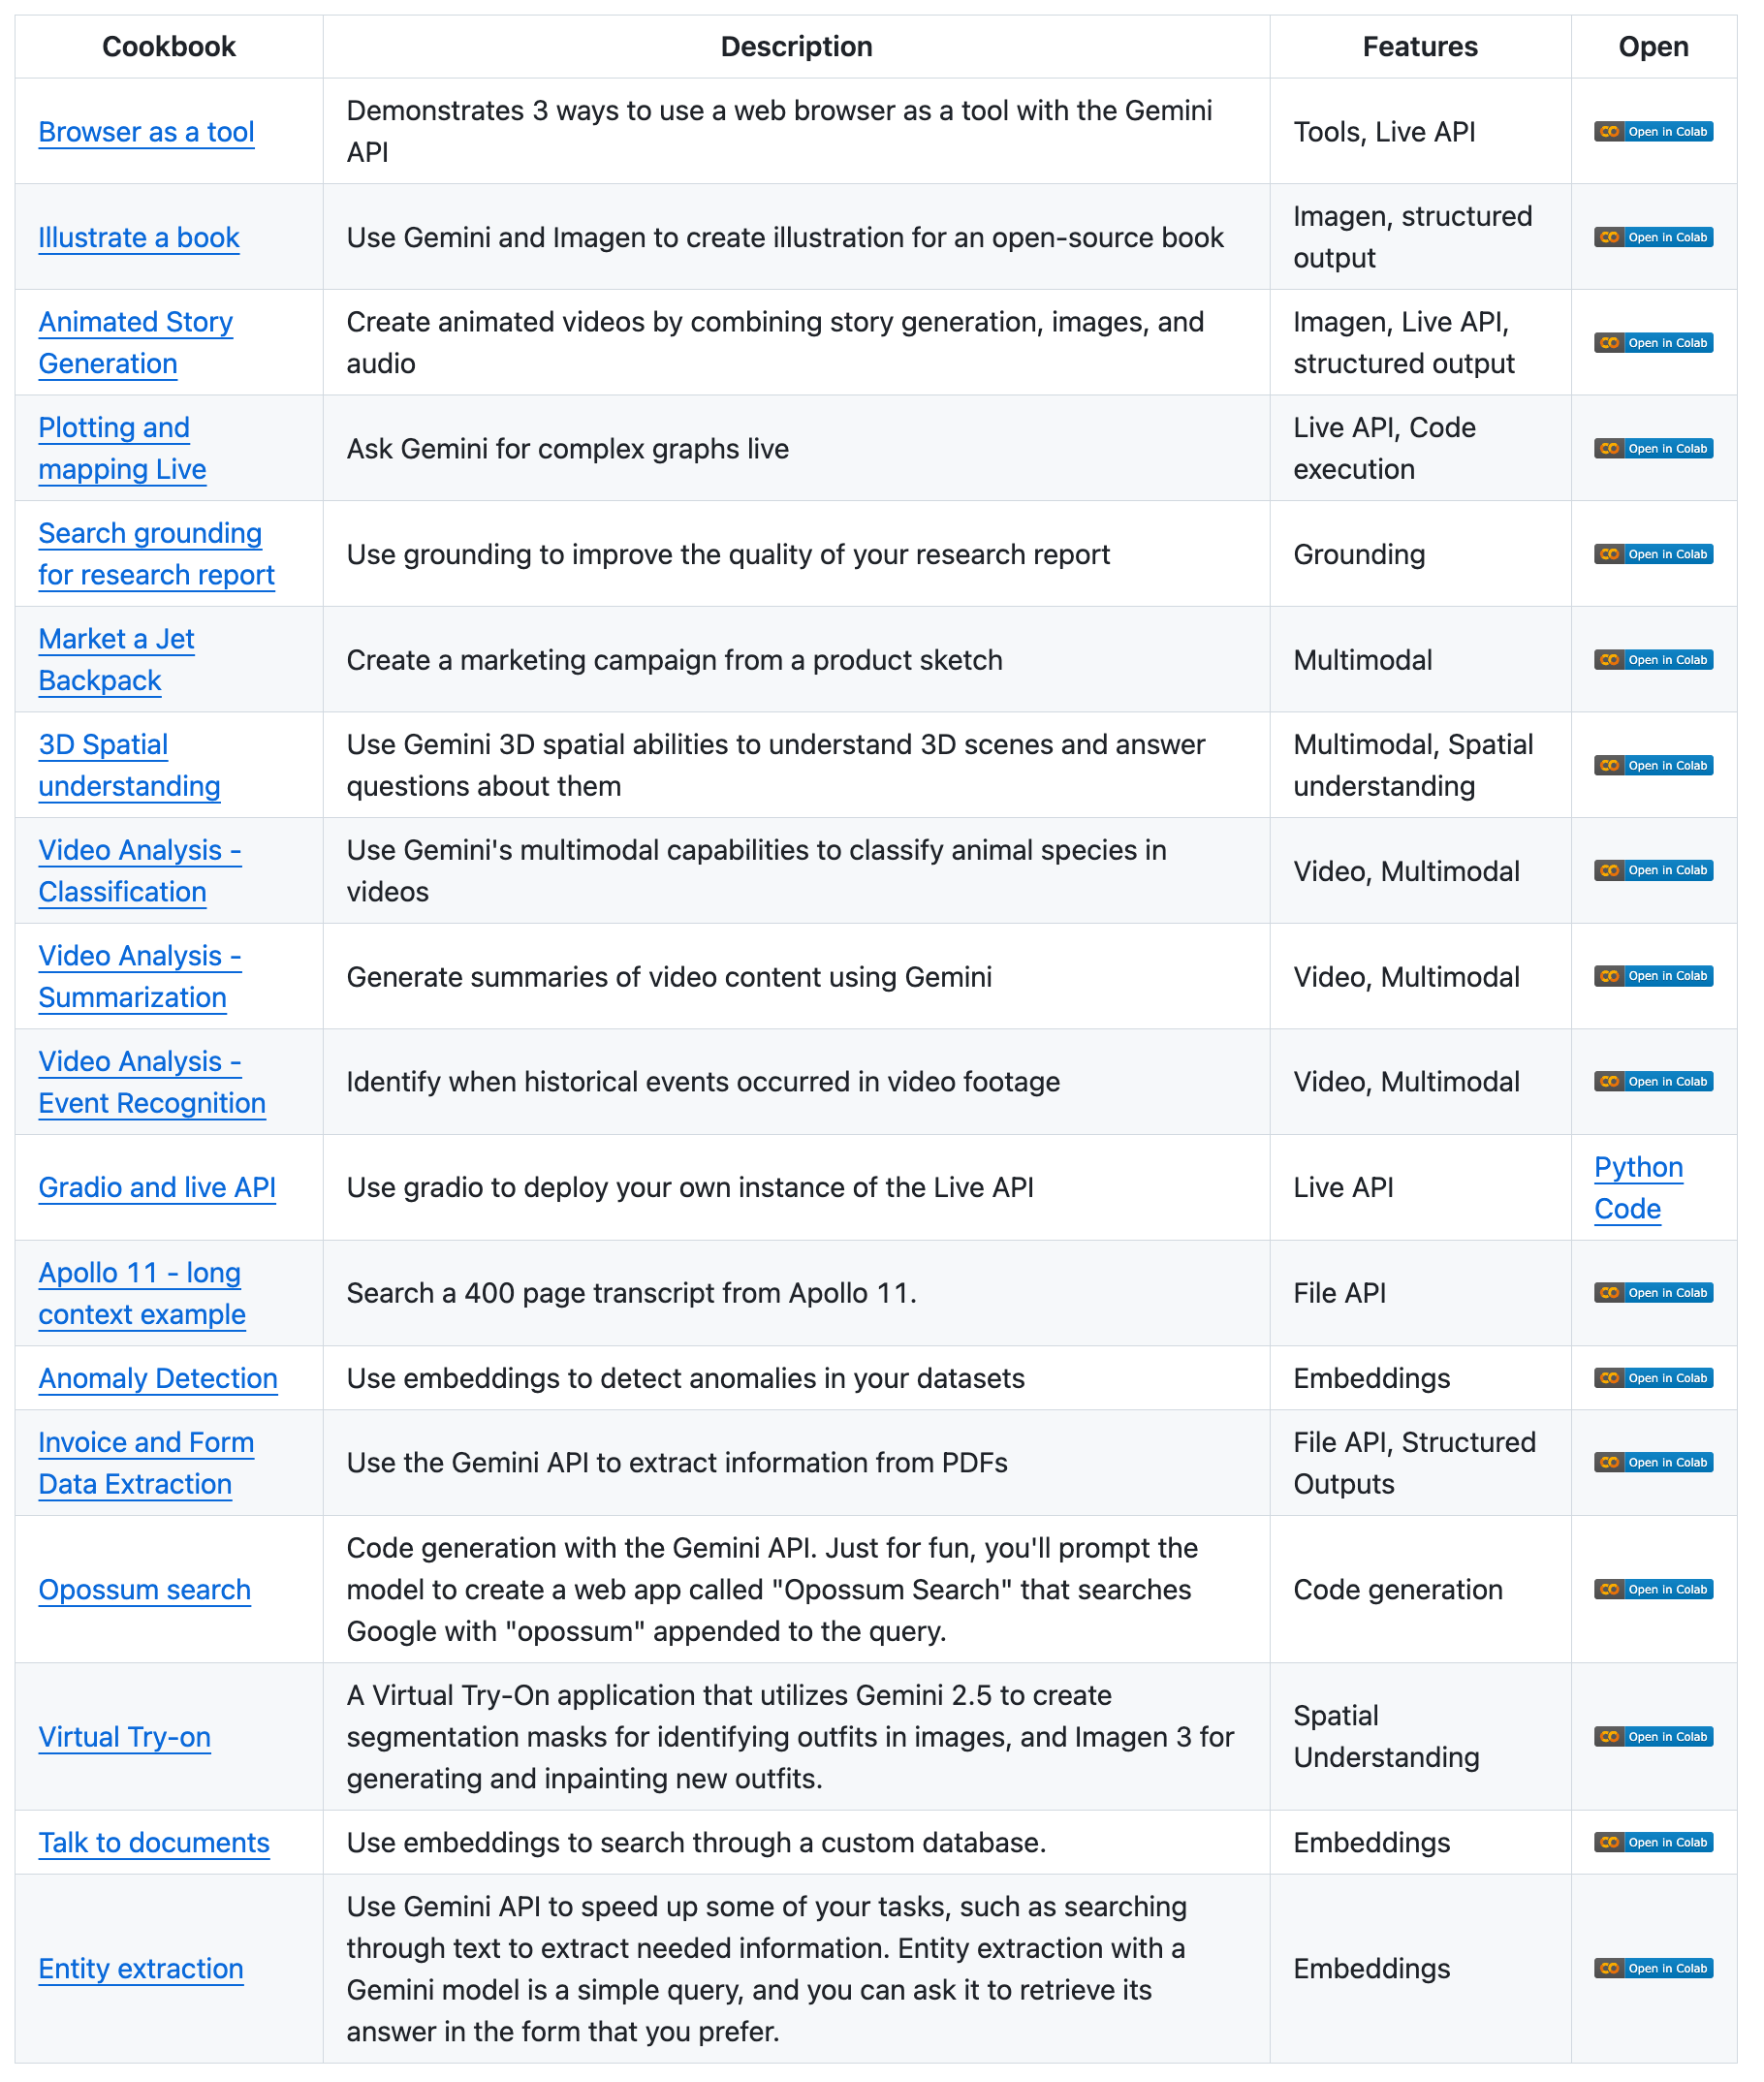
저처럼 생성형 AI를 이용한 앱을 만드는 데 관심이 생기신 분들은 구글이 깃헙에 공개해둔 Gemini API 활용 가이드 및 쿡북 저장소도 보시면 좋습니다.
스타터 앱들은 재미있는 웹앱 예제들이었는데 반해 여기에는 다양한 파이썬 예제들이 나와있어요. 몇시간 전 공개된 따끈따끈한 Gemini 2.5 Flash 사용 예제도 포함합니다. (2.5 Flash에 대한 분석 내용은 쓰레드의 hon_coding님 글 붙여둡니다)
저는 얼마 전부터 생성형 AI로 살아있는 게임을 만드는 팀을 도와주고 있는데요. 요즘 개발이 너무 재미있는데, 이런 거 보다 보면 개발 의욕이 더 솟는게 느껴집니다.
Member discussion